
How to: Backup your MikroTik CHR configuration with Oxidized.
Oxidized is a great tool for backing up network configs without all the manual work. It’s written in Ruby and runs fast, whether you’ve only got a few switches or a huge network to look after. Instead of logging into each box one by one to save configs, you just set up a schedule and let Oxidized do it for you.
The best part is how it ties into Git. Every time it backs up a config and notices something changed, it commits that change straight into a Git repo. That means you’ve got a full history of every config, with the ability to pull up a diff whenever you want. You can see exactly what changed, when it changed, and even who made the change if you’ve set it up that way. It’s a lifesaver for troubleshooting, auditing, or just keeping things stable day to day.
In this Tutorial, we will show you how to install Oxidized on Debian and RHEL-based Linux distros and add your first MikroTik device.
Installation:
You can start by installing your favorite RHEL or Debian-based Linux distro.
After installing Linux, you can create the user oxidized, as it is recommended not to run Oxidized as root.
On Debian, running:
sudo adduser --disabled-password --gecos "" oxidized
will create a user named oxidized with no password. The –gecos part will ensure that the user details are left empty, and that you will not be prompted to fill them in.
To do this on RHEL-based systems, do:
sudo useradd -m -s /bin/bash -c "" oxidized
sudo passwd -l oxidized
After that, you can give sudo rights to the oxidized user by adding it to the sudoers group with:
sudo visudo
Then enter this in the opened file:
oxidized ALL=(ALL) NOPASSWD:ALL
Note: Adding the users to the sudoers file is the same on both Debian and RHEL-based distros.
After that, you can switch to the oxidized user by using the command:
su – oxidized
Oxidized uses Ruby, so the first thing you will need to do is install it:
For Ubuntu you need to start with:
add-apt-repository universe
On Debian-based Distros:
sudo apt install ruby ruby-dev libsqlite3-dev libssl-dev pkg-config cmake libssh2-1-dev libicu-dev zlib1g-dev g++ libyaml-dev
For Rocky Linux 9 you need to start with:
dnf install epel-release
dnf config-manager --set-enabled crb
dnf module enable ruby:3.1
For RHEL-based Distros:
dnf -y install ruby ruby-devel sqlite-devel openssl-devel pkgconf-pkg-config cmake libssh-devel libicu-devel zlib-devel gcc-c++ libyaml-devel which
Next, install Oxidized and its extensions:
sudo gem install oxidized
sudo gem install oxidized-web
sudo gem install oxidized-script
After you are done, you can check if everything installed smoothly by entering the command:
oxidized -v
Oxidized configuration:
Make sure you are logged in as the oxidized user and run:
oxidized
This will start the application and generate the needed files in /home/oxidized/.config/oxidized
Then open the config file by running:
sudo nano /home/oxidized/.config/oxidized/config
The Initial config should look like this:
---
username: username
password: password
model: junos
resolve_dns: true
interval: 3600
debug: false
run_once: false
threads: 30
use_max_threads: false
timeout: 20
timelimit: 300
retries: 3
prompt: !ruby/regexp
/^([\w.@-]+[#>]\s?)$/
next_adds_job: false
vars: {}
groups: {}
group_map: {}
models: {}
pid:
"/home/oxidized/.config/oxidized/pid"
extensions:
  oxidized-web:
    load: false
crash:
  directory:
"/home/oxidized/.config/oxidized/crashes"
  hostnames: false
stats:
  history_size: 10
input:
  default: ssh, telnet
  debug: false
  ssh:
    secure: false
  ftp:
    passive: true
  utf8_encoded: true
output:
  default: file
  source:
    default: csv
model_map:
  juniper: junos
  cisco: ios
Note: The config file is in YAML format. Keep in mind that the formatting is incredibly important, even one space more or less can break your server.
Before adding any devices, let's make a few changes so we enable the Web GUI, logging, and the local GIT library that will contain your backup files.
---
username: username
password: password
model: junos
log: /home/oxidized/.config/oxidized/logs/oxidized.log #For logging
rest: your.oxid.ip.addr:8888 #For the Web GUI
resolve_dns: true
interval: 3600
debug: false
run_once: false
threads: 30
use_max_threads: false
timeout: 20
timelimit: 300
retries: 3
prompt: !ruby/regexp /^([\w.@-]+[#>]\s?)$/
next_adds_job: false
vars: {}
groups: {}
group_map: {}
models: {}
pid: "/home/oxidized/.config/oxidized/pid"
extensions:
  oxidized-web:
    load: true #For Web GUI
    host: your.oxid.ip.addr #For Web GUI
    port: 8888 #For Web GUI
crash:
  directory: "/home/oxidized/.config/oxidized/crashes"
  hostnames: false
stats:
  history_size: 10
input:
  default: ssh, telnet
  debug: false
  ssh:
    secure: false
  ftp:
    passive: true
  utf8_encoded: true
output:
  default: git
  git:
    single_repo: true #For Single Git Repo single_repo: false #For separate Git repo for each group
    user: Oxidized
    email: [email protected]
    repo: /home/oxidized/.config/oxidized/configs.git #For Single Git Repo repo: “/home/oxidized/.config/oxidized/configs” #For separate Git repo for each group
source:
  default: csv
  csv: #For the CSV
    file: /home/oxidized/.config/oxidized/router.db #For the CSV
    delimiter: !ruby/regexp /:/ #For the CSV
    map: #For the CSV
      name: 0 #For the CSV
      model: 1 #For the CSV
      username: 2 #For the CSV
      password: 3 #For the CSV
      group: 4 #this one is needed if you will be using separate Git repositories for each group of devices.
  default: csv
model_map:
  juniper: junos
  cisco: ios
Adding RouterOS devices to Oxidized:
Before we start the service, we need to add at least one device to back up. In this guide, we will use one of our MikroTik CHRs.
We recommend creating a read-only account for oxidized, which you can use with the same credentials on multiple devices.
You can create the user from CLI or Winbox.
From Winbox, go to System, Users, click New, fill in the user credentials (make sure to keep the user group as read), and click Apply.

From CLI:
/user/add name=oxidized group=read password=yourstrongpassword
Now, go back to the oxidized configuration file, and add the username and password, change the model to routeros, and add MikroTik to the model map.
---
username: oxidized  #Change to the username of your oxidized accouny
password: yourstrongpassword  #Change to the password
model: routeros  #Model must be routeros
log: /home/oxidized/.config/oxidized/logs/oxidized.log
rest: your.oxid.ip.addr:8888
resolve_dns: true`
interval: 3600
debug: false
run_once: false
threads: 30
use_max_threads: false
timeout: 20
timelimit: 300
retries: 3
prompt: !ruby/regexp /^([\w.@-]+[#>]\s?)$/
next_adds_job: false
vars: {}
groups: {}
group_map: {}
models: {}
pid: "/home/oxidized/.config/oxidized/pid"
extensions:
  oxidized-web:
       load: true
       host: your.oxid.ip.addr
       port: 8888
crash:
  directory: "/home/oxidized/.config/oxidized/crashes"
  hostnames: false
stats:
  history_size: 10
input:
  default: ssh #Remove Telnet, leave only SSH for security
  debug: false
  ssh:
    secure: false
  ftp:
    passive: true
  utf8_encoded: true
output:
  default: git
  git:
    single_repo: true
    user: Oxidized
    email: [email protected]
    repo: /home/oxidized/.config/oxidized/configs.git
source:
  default: csv
  csv:
    file: /home/oxidized/.config/oxidized/router.db
    delimiter: !ruby/regexp /:/
    map:
      name: 0
      model: 1
      username: 2
      password: 3
      group: 4
  default: csv
model_map:
  juniper: junos
  cisco: ios
  mikrotik: routeros  #Add MikroTIk to the model map
We need to create the CSV file in which the information for your devices will be stored.
nano /home/oxidized/.config/oxidized/router.db
Add your routeros devices in this format:
Name(ip):model:username:password or Name(ip):model:username:password:group if you are going to use separate Git repositories.
With one Git repo, this would look like this:
Your.router.ip.addr:routeros:oxidized:yourstrongpassword
With multiple repos, it will look like this:
Your.router.ip.addr:routeros:oxidized:yourstrongpassword:ExampleGroup
After that, start the service with:
oxidized
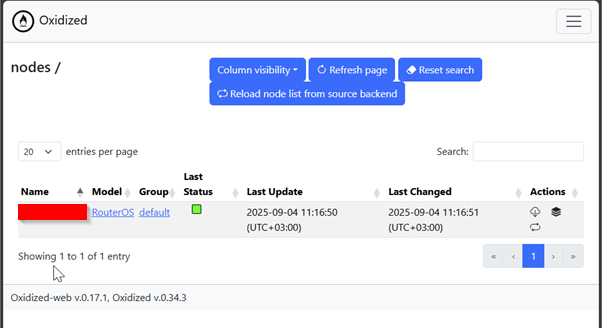
Now, if you go to the IP address and port of the server, you should be seeing the Web UI with your router configuration already in it.
Single Git repository:
Multiple Git repositories:
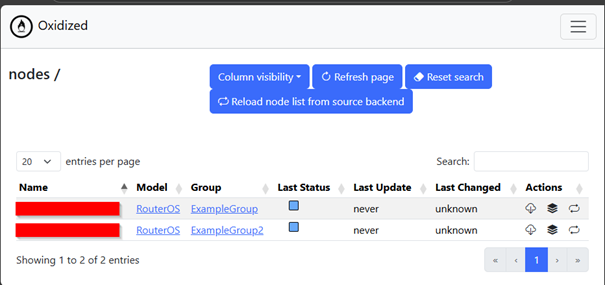
From here, you can explore each of the actions on the right side of the screen.
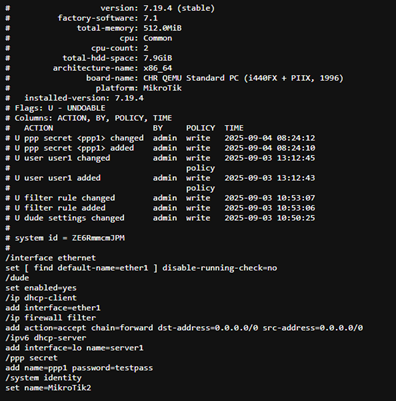
The cloud button will take the current config backup and show it to you in text format, like this:
Pressing the arrows in a circle button will renew the configuration backup.
And the 3 stacked papers button will take you to a list of all the taken backups for the device, where you can explore and compare them.
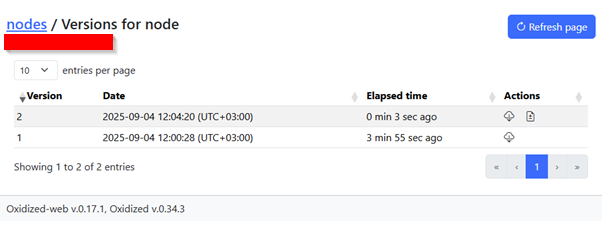
By pressing the paper with + and – signs on it next to the latest backup, you will be taken to the comparison menu.
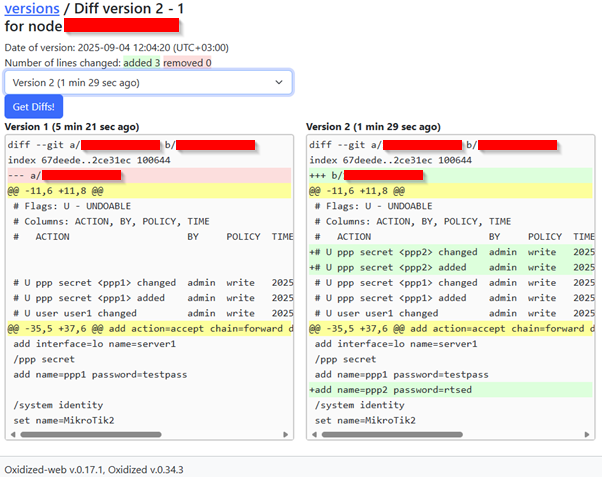
Here you can see the differences between the two backups.
That’s it for the initial setup of your Oxidized backup server. At this point, you’ve got the basics in place—your devices are being backed up automatically, and changes are tracked in Git so you always have a history to fall back on.
If you’d like to go further, we’ve put together another guide that covers additional security hardening, like adding NginX proxy for basic Web GUI authentication and more restrained users for the mikrotik Devices, and some quality-of-life improvements you can add to Oxidized. These are not required, but they’ll secure your setup and make it easier and better suited for long term management.