
Oxidized: Quality of life, and additional security features
In our first guide, which you can read here, we successfully set up Oxidized. In this one, we will show you a few extra steps you can take to make it more secure and easier to manage.
In this guide, we’ll walk through setting up NGINX as a proxy to add authentication for the Web UI, show you how to customize device connections with different SSH ports, and make some small quality-of-life changes like using friendly device names.
We’ll also cover creating a dedicated user with limited permissions on MikroTik devices to tighten security.
Adding NGINX proxy for WEB UI authentication for Oxidized
To implement simple authentication for the Web GUI, we need to install an NGINX proxy on the server.
NGINX installation.
On Debian-based distros:
sudo apt update
sudo apt install nginx apache2-utils -y
On RHEL-based distros:
sudo dnf install nginx httpd-tools -y
Create a user password file.
sudo htpasswd -c /etc/nginx/.oxidized_passwd myuser
Change myuser to the username you want; the command will prompt you to enter and reenter the password for the user.
Next, create a new NGINX site.
On RHEL-based systems:
sudo nano /etc/nginx/conf.d/oxidized.conf
On Debian-based systems:
sudo nano /etc/nginx/sites-available/oxidized
Here is a basic config for this file that will provide you with a basic form of authentication
server {
    listen 80;
    server_name oxidized.example.com;  # Replace with your domain or IP

    location / {
        proxy_pass http://127.0.0.1:8888;   # Oxidized Web UI default port
        proxy_set_header Host $host;
        proxy_set_header X-Real-IP $remote_addr;
        proxy_set_header X-Forwarded-For $proxy_add_x_forwarded_for;
        proxy_set_header X-Forwarded-Proto $scheme;

        # Basic authentication
        auth_basic "Restricted Access";
        auth_basic_user_file /etc/nginx/.oxidized_passwd;
    }
}
After this is done, we will have to go and make a few changes to the Web UI part of the config file.
As you can see in the NGINX config, we have a line that makes it so the requests to your.oxid.ip.add are forwarded to 127.0.0.1:8888, which means it is locally forwarded to port 8888 on which oxidized web ui listens.
Open the oxidized config file:
sudo nano /home/oxidized/.config/oxidized/config
In there, change two rows:
rest: 127.0.0.1:8888 instead of your.oxid.ip.add
And:
oxidized-web:
load: true
host: 127.0.0.1 instead of your.oxid.ip.add
port: 8888
Now, after saving the configuration, we can activate nginx:
On Debian:
sudo ln -s /etc/nginx/sites-available/oxidized /etc/nginx/sites-enabled/
sudo nginx -t
sudo systemctl restart nginx
On RHEL-based systems:
sudo nginx -t
sudo systemctl enable nginx
sudo systemctl restart nginx
After that, kill oxidized if it is still running:
pkill oxidized
And then start it/ start it again:
oxidized
Now you will not be able to access oxidized on your.oxid.ip.add:8888 anymore, you will have to go to nginx on address your.oxid.ip.add without port, and after authenticating with the account we created earlier, you will be forwarded to the Oxidized Web UI.
Changing the port for SSH to something other than port 22 (good practice)
You need to start by changing the SSH port in your MikroTIk device.
You can do this from CLI or Winbox.
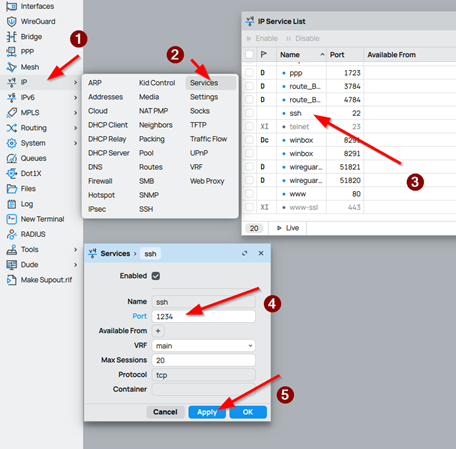
From Winbox:
Go to IP, Services, double-click on ssh, change the port to a port of your choice, and click Apply.
From CLI:
/ip/service/set ssh port=2345
Now we will have to jump back on the oxidized server and configure it to use the ports specified in the CSV file for each device connected to it.
First, we need to edit the CSV map in the configuration file:
Vars_map needs to be added to the CSV config, and ssh_port: 4 needs to be added under it.
  csv:
    file: /home/oxidized/.config/oxidized/router.db
    delimiter: !ruby/regexp /:/
    map:
      name: 0
      model: 1
      username: 2
      password: 3
    vars_map:
      ssh_porrt: 4
This will tell oxidized that there is another field in the CSV file which contains the SSH port it needs to use.
Now go to the routers.db file, and let's add the port.
sudo nano /home/oxidized/.config/oxidized/router.db
Then add the port at the end of the configuration we made earlier:
Your.router.ip.addr:routeros:oxidized:yourpassword:2345
Now, when you start the oxidized server again, it will connect to the devices on the specified port in the CSV file.
Change the name of the router to one you have specified in the CSV file (cosmetic)
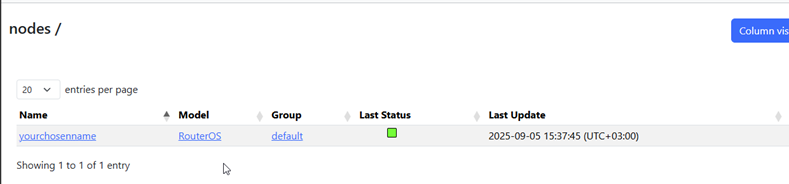
By default, oxidized shows your IP address that you use to connect in the name column. (As shown in the picture below)

We can make it so the name is something you enter manually to make it easier to differentiate between your devices, and still use IP to connect to the device.
The process to do this is relatively the same as changing the SSH port. First, we need to edit the CSV map in the configuration file.
sudo nano /home/oxidized/.config/oxidized/confi
Go under map in the CSV portion of the configuration, and we need to add the ip: 0 section and put it in the first position by using 0. That way, oxidized will use the IP instead of the name to connect to the devices. You will need to change the numbers of the other options accordingly:
  csv:
    file: /home/oxidized/.config/oxidized/router.db
    delimiter: !ruby/regexp /:/
    map:
      ip: 0
      name: 1
      model: 2
      username: 3
      password: 4
    vars_map:
      ssh_port: 5
After that, we can add the name in the CSV file in the appropriate position:
sudo nano /home/oxidized/.config/oxidized/router.db
Then add the name at the second position:
Your.router.ip.addr:yourchosenname:routeros:oxidized:yourpassword:2345
Now, when you start oxidized, you will see the name you have chosen in the Name column instead of the IP address.
Creating a user with special permissions for your MikroTik Devices.
In the initial setup guide, we used a normal read-only account, the read group on Mikrotik has a lot of permissions we do not need for Oxidized to function correctly.
We can make a new group that has only the needed permissions.
Go to System, Users, click on Groups, then on New, now fill in the name of the group, and then pick only ssh, read, and sensitive (if you want the user to have the right to view/export sensitive information), click Apply.
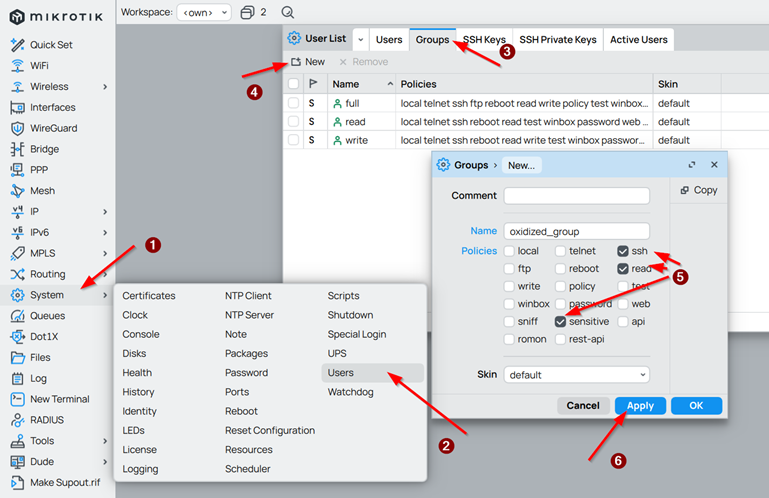
From Cli:
/user group add name=oxidized_group policy=read,ssh,sensitive
From Winbox, go to System, Users, click New, fill in the user credentials, and change the group to the oxidized one we created, click Apply.
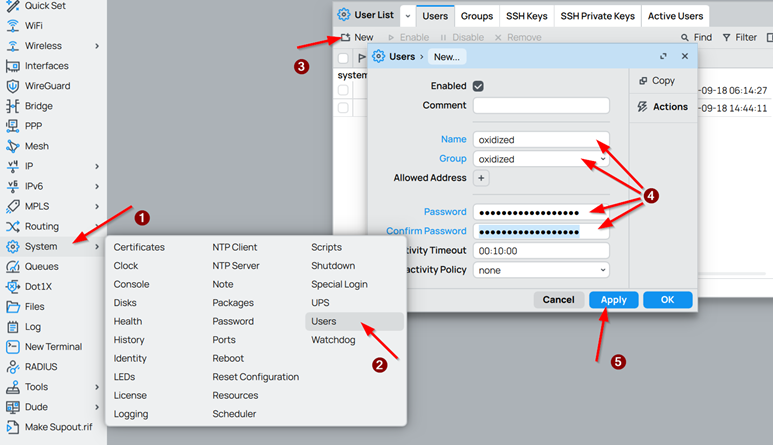
From Cli:
/user/add name=oxidized group=oxidized password=yourstrongpassword
Now you can use this user in place of the read-only one we created in the initial setup guide. This way, your account will have only the rights it needs to function, improving the security of your system.
With these changes in place, your Oxidized setup is not only more secure but also easier to use day to day. Adding NGINX authentication helps protect the Web UI, custom device names make management cleaner, and limiting user permissions and custom SSH ports keep your environment safer.With these changes in place, your Oxidized setup is not only more secure but also easier to use day to day. Adding NGINX authentication helps protect the Web UI, custom device names make management cleaner, and limiting user permissions and custom SSH ports keep your environment safer.