
MikroTik CHR: Basic system protection (+ video)
In this article, we will talk about basic security principles when managing your MikroTik device, whether if it's a CHR or a physical device (router, access point, smart switches running RouterOS, even the new MikroTik ROSE server)
First to consider! Newer physical MikroTik devices come with their default password written on a label, however most devices still have weak credentials and come with most services open by default. This might lead to device compromise, hacking and unauthorised access, if nothing is changed as soon as the device is connected and online.
Here You will find the essential steps to protect your newly purchased MikroTik CHR from intrusion. These rules can be also helpful for physical MikroTik devices.We will show it in Winbox / Webfig with commands for the CLI.
Here's a small video explaining the process:
1. Changing the default password and user
Firstly, after you log in your CHR, it will prompt you to change your password. This must be done immediately, especially if you have an older MikroTik device or a CHR. In most cases you should leave the old password field empty, if the default credentials did not have any password. Then you have to enter the new password twice and by clicking the "Change now" button, the new credentials will take place when establishing new sessions. 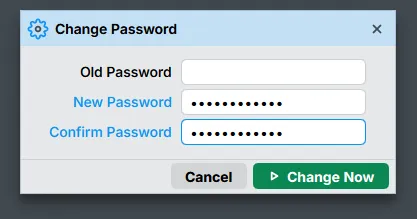
A better security practice is to create a new username and password with Full privileges, it is done by going to the System>Users window and then by clicking on "new" and entering the new user's credentials. Additionaly for an extra layer, you may specify from which IP ranges the account can access, this will affect only the remote methods of connection. If the wrong ranges are placed, the user will still be able to access it via local means, e.g. an physical Console cable access, or an VNC connection for the CHRs.
You must put the new admin account in the full group, in order to not lose access to your device.
user add group=full name=newadmini password=H@rDt0Gu3SsP@sSw0Rd
After that, delete the default user by marking it and clicking on remove: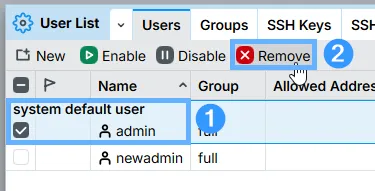
CLI users can remove the old admin user by using user print, and then user remove X where X is the ID of the older admin user.
2. Keep your RouterOS updated
Even if RouterOS ocasionally has vulnerabilities, it is still recommended to keep your CHR or physical device up to date. Updates provide bugfixes, stability improvements and new features that can help you manage it easier. Updating RouterOS is done easily by going to System>Packages and then "Check for updates". From there you can see the changelog for the new RouterOS version, if available and the option to choose the channel from which you can get your updates.
z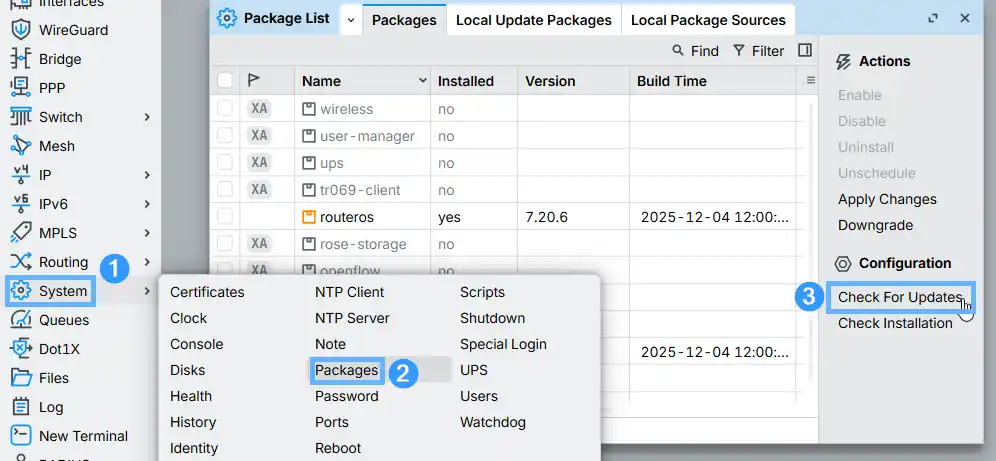
If you are still running RouterOS v6, you can upgrade it to RouterOS v7 by choosing the "upgrade" channel. This will upgrade it to v7.12.1 and to get the newest RouterOS version, you have to update it once more.
For most cases, the stable channel is mostly used, but you can also use the "long-term" channel for even more stable experience. After that, you can choose between downloading and installing, and only downloading it. After the update is downloaded, the device or CHR should restart to install it. If you use CHR, you must have an active free or P license, to allow the updates.
3. Close the unused service ports
Modify the service ports so that unused services are disabled, and those who will be used is not on it’s default ports. It is very useful against bots. Our CHRs come with only Winbox and HTTP services enable, which enable it to be managet via the Winbox app or via the web browser.
It is best to use ports of your choice for the services that will be still used, but not overlapping reserved system ports.
https://en.wikipedia.org/wiki/List_of_TCP_and_UDP_port_numbers#Well-known_ports
In this example we will disable API, API-SSL, Telnet, FTP, WWW and WWW-SSL services. It is done by going to IP>Services, marking these services and then clicking on "Disable"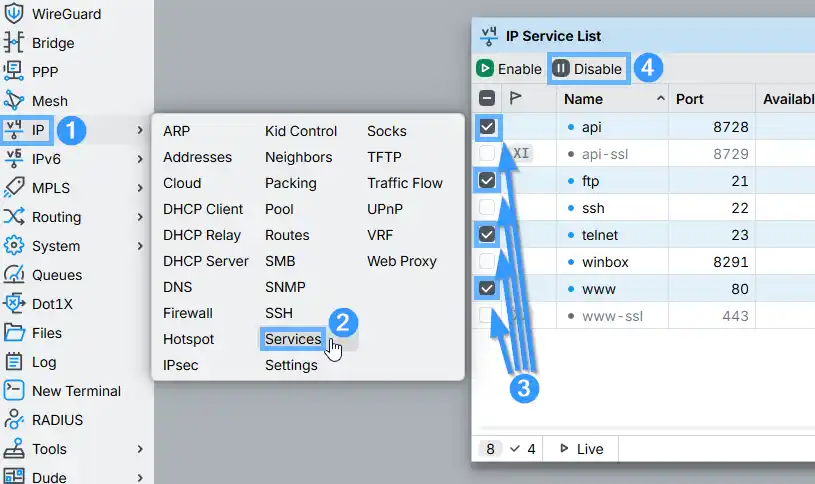
ip service disable api,api-ssl,ftp,telnet,www,www-ssl
After that you can change port for SSH, in this example, we will set it to port 27482 (randomly generated)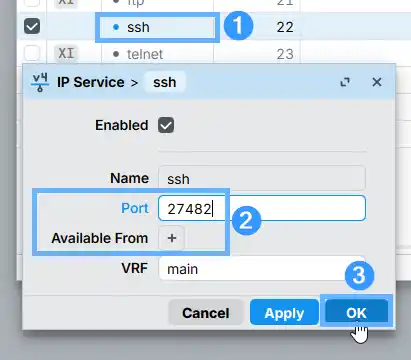
ip service set ssh port=27482
You may also specify the IP ranges that can access that service. We however recommend it doing with firewall rules(shown next) as doing it only from here won't hide the device from port scanners.
WinBox port can also be changed for higher security, but it might break some legacy managing applications that have the WinBox port hardcoded and don't allow specifying the port.
4. Add firewall/filter rules
This is really powerful way to block the unwanted traffic. However as it is really powerful, you might lose the connection to your CHR or physical device if misconfigured, so it must be done carefully with caution. The only way to fix misconfigurations are via an local console connection or a VNC console for the CHRs, or in worse cases - by reseting or rebuilding the router.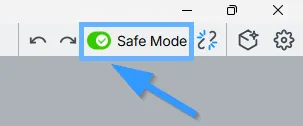
For that, MikroTik created the Safe Mode, which will revert the settings to a state before enabling it, in case you lose connection to the CHR while configuring critical settings. It can be enabled via the switch on the upper right corner (or upper left corner for Winbox v3), and for the CLI users, the shortcut is Ctrl + X. After everything is configured and working, the mode should be disable to save the settings, else the settings will revert to the previous state after loging out.
Chain INPUT:
Here, we will enter some rules for traffic, coming into the CHR or the physical device. Here we will put some basic rules for protecting the access to our CHR. They are as follows:
Allowing ICMP ping traffic
Allowing WinBox Access on port TCP 8291
Allowing SSH Access on port TCP 27482
Accepting established and related connection
Allowing DNS queries from trusted networks (e.g. 192.168.99.0/24) on port UDP 53 - optional
Droping everything else, that didn't pass via the above rules.
The "Allow DNS for trusted networks" can be used if we want a certain network to query the MikroTik's internal DNS for static rules or AdLists.
Every rule is added by going to IP>Firewall and clicking on "New" after which the input chain is chosen, as well as setting the protocol and ports and ensuring that the correct action is chosen in the action tab. It is also good to comment each rule, so you can find it quickly when you need it. We will show an example with the "Allowing WinBox Access on port TCP 8291" rule.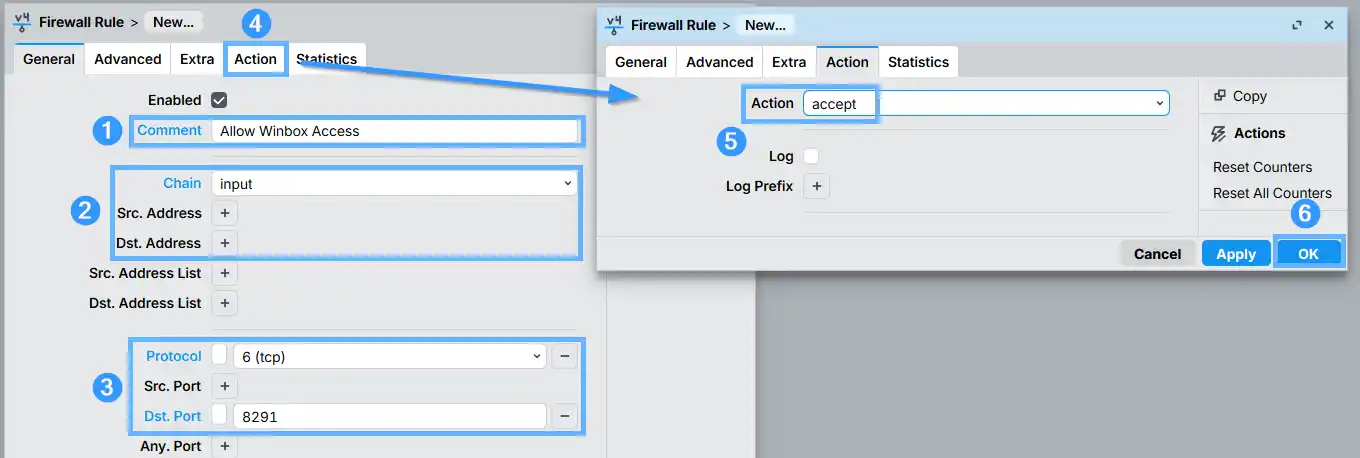
Additionaly for an extra layer of security, you can use the Src. Address option to add specific ranges that will be accepted(or blocked) by the rule, This is really helpful especially when you want to restrict the access to the management ports of your CHR or device to certain networks, further shrinking the attack surface. For the CLI users, they can add the option src-address=XX.XX.XX.XX/XX
ip firewall filter add action=accept chain=input comment="Allow ICMP ping" protocol=icmp
ip firewall filter add action=accept chain=input comment="Allow WinBox" dst-port=8291 protocol=tcp
ip firewall filter add action=accept chain=input comment="Allow SSH" dst-port=27482 protocol=tcp
ip firewall filter add action=accept chain=input comment="Accept established connections" connection-state=established
ip firewall filter add action=accept chain=input comment="Accept related connections" connection-state=related
ip firewall filter add action=accept chain=input comment="Allow DNS for trusted network" dst-port=53 protocol=udp src-address=192.168.99.0/24
ip firewall filter add action=drop chain=input comment="Drop everything else"
Chain FORWARD:
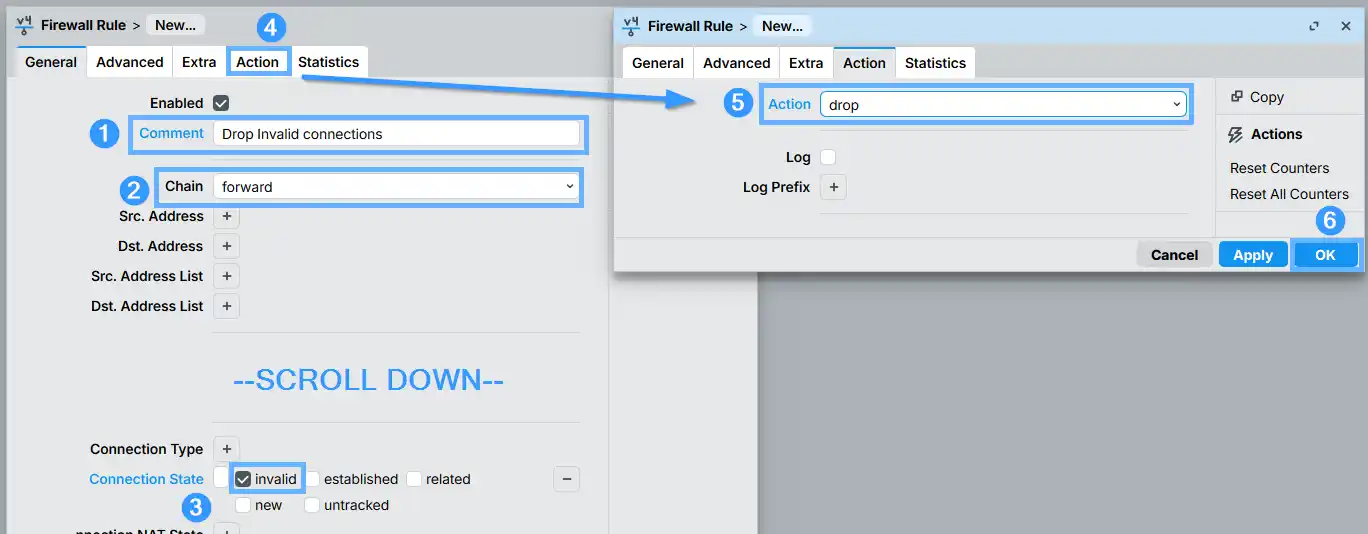
These are the rules for the traffic that goes through the CHR or physical device. In Cloud Hosted Router, forwarding table might be very different depending on the particular use scenario. In this example, we will create a forward rule, that will drop all invalid traffic, that goes through the CHR. Ensure that the Chain is "forward" and after scrolling down, click on the "+" next to the Connection state field and mark "Invalid". Then go to the Action tab and choose the Drop action.
.
ip firewall filter add action=drop chain=forward comment="Drop invalid connections" connection-state=invalid
In the end, the firewall should look something like this.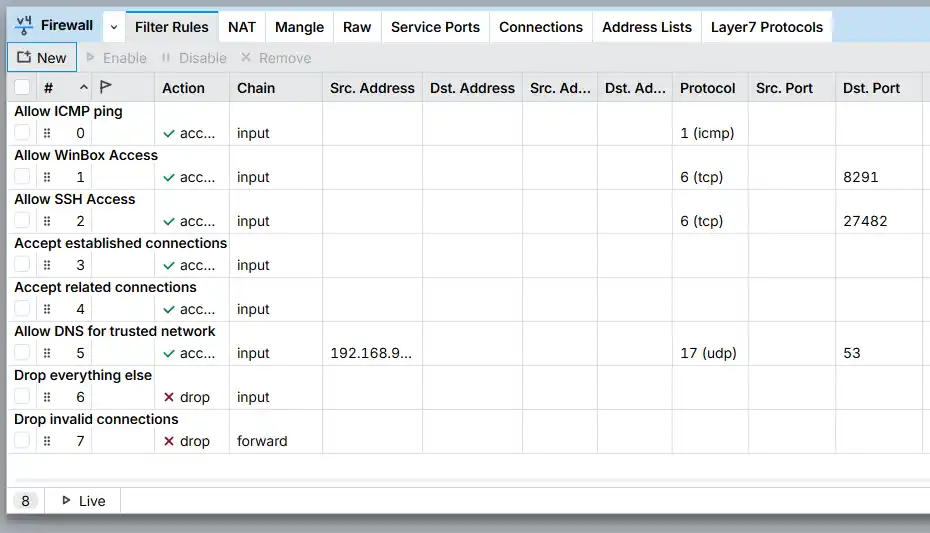
Please, be noted that the above firewall rules are NOT complete protection! It is only the very basic rules, and they should be appended or modified according to the real set-up!