
Setup OpenVPN Connect Client in Android
This guide walks you through connecting your Android phone or tablet to an OpenVPN server running on a MikroTik Cloud Hosted Router or your physical MikroTik device. If you haven't set up your server yet, start with our OpenVPN server setup guide first.
Table of Contents
The official OpenVPN client for Android is OpenVPN Connect, published by OpenVPN Technologies. Download it for free from Google Play Store:
OpenVPN Connect — Google Play Store
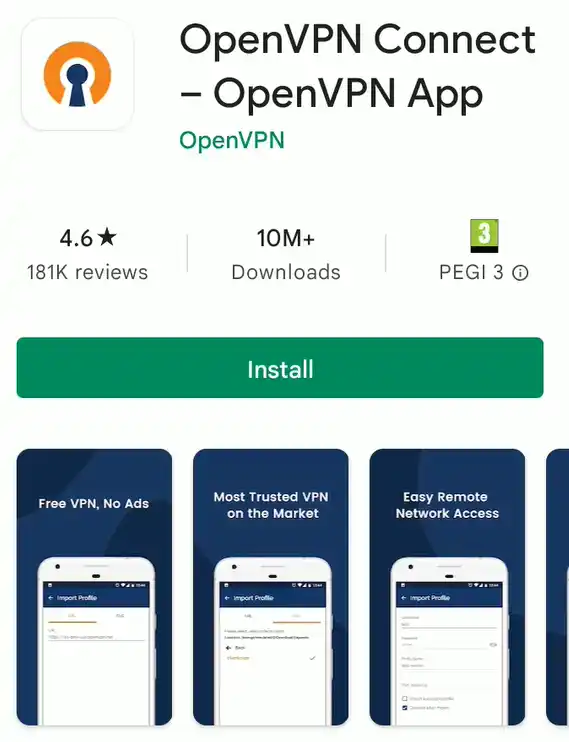
Install the app and then come back here to continue — you'll need it open once your configuration file is ready.
Before you can connect, you need a VPN user account on the server. Log in to your MikroTik CHR via WinBox or Webfig, go to PPP > Secrets, and click + NEW. Set a username and a strong password and make sure the profile is set to default-encryption.
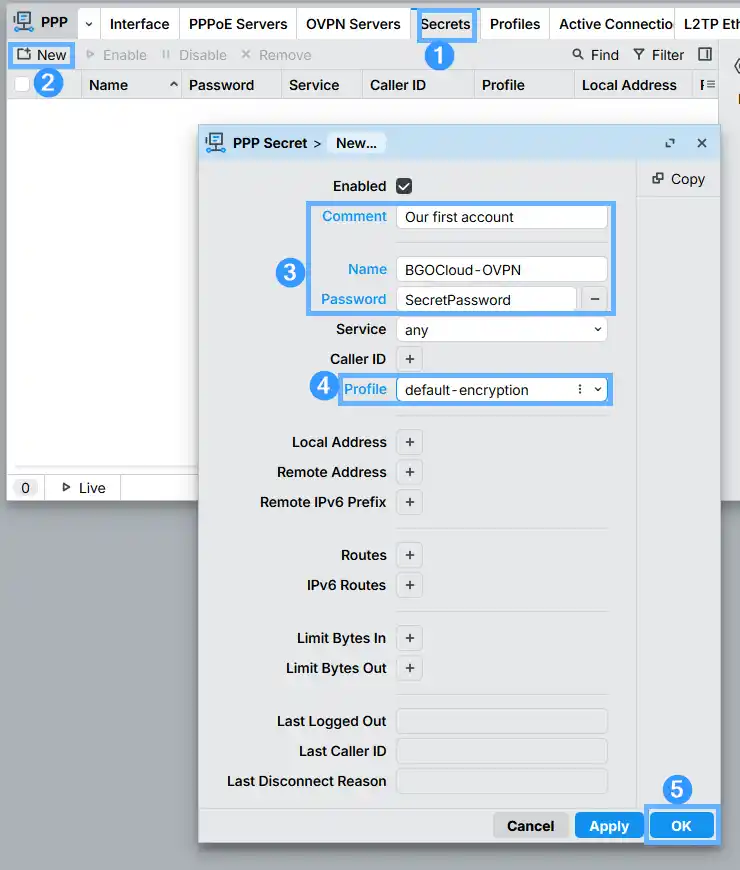
Keep this username and password handy — you'll enter them in the OpenVPN Connect app when importing the profile.
You'll need the following certificate files from your CHR to build the configuration:
- The CA certificate (
.crt) - The client certificate (
.crt) - The client certificate private key (
.key)
In WinBox, go to System > Certificates. Right-click each certificate and choose Export. Give them clear names. When exporting the client certificate, always set a passphrase — you'll enter it in the OpenVPN Connect app as the Private Key Password.
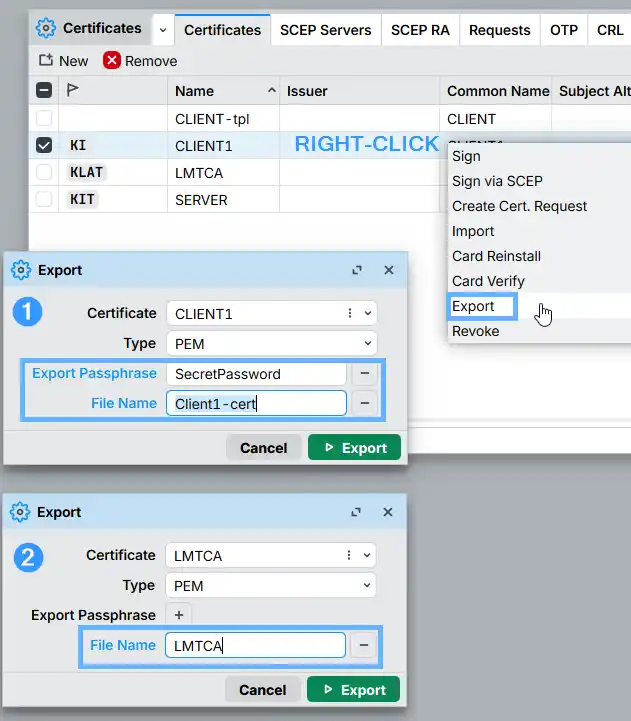
certificate export-certificate CLIENT1 export-passphrase=12345678
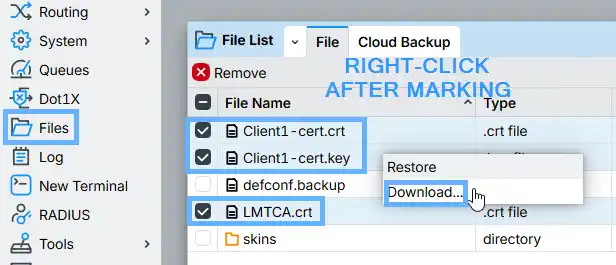
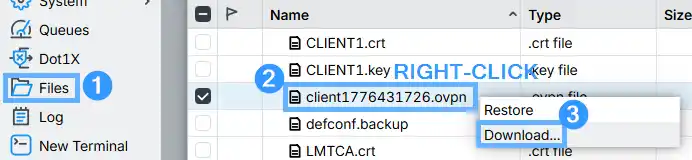
The exported files appear in Files on the CHR. Select them all and drag-and-drop them to a folder on your computer, or right-click and choose Download.
There are two ways to get your .ovpn config: let RouterOS generate it for you (easiest, requires v7.9+), or build it manually from a template. For Android, it is best to embed all certificates directly in the file.
4a. Auto-export from RouterOS (v7.9+) — easiest method
Since RouterOS v7.9, you can generate a complete .ovpn config directly from the CHR. It picks the best encryption settings automatically and embeds all the necessary certificates — ideal for Android.
In WinBox, go to PPP > OVPN Servers and open any server (RouterOS 7.17+) or PPP > Interface > OVPN Server (older versions) and click Export .ovpn. Fill in your CHR's public IP address, then select the CA certificate, the client certificate, and its key.
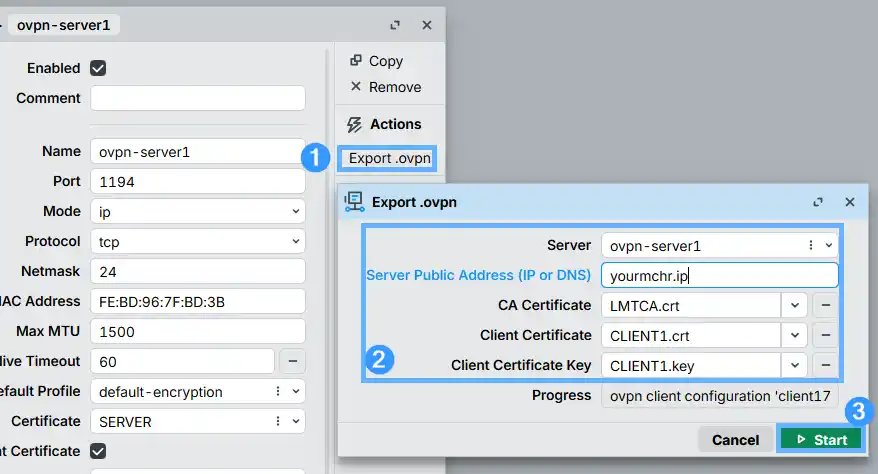
The generated .ovpn file will appear in Files on the CHR. Right-click it and choose Download to save it to your computer.
The RouterOS-generated config doesn't enable full tunnel routing or credential cache clearing by default. Open the file in any text editor and add these two lines just before the embedded certificate block:
reneg-sec 3600
remote-cert-tls server
auth-nocache
redirect-gateway def1
<ca>
-----BEGIN CERTIFICATE-----
...
4b. Build the config from scratch
If you're on RouterOS older than v7.9, or want full control over the config, create a new file with a .ovpn extension and open it in a text editor. Paste the template below, adjusting the IP address, port, cipher, and auth to match your server's settings. Then paste the full contents of each certificate and key file into the matching section — all certs must be embedded, not referenced by filename.
dev tun
proto tcp-client
remote IP_ADDRESS_OF_YOUR_CHR
port 1194
nobind
persist-key
persist-tun
tls-client
remote-cert-tls server
<ca>
PASTE CONTENTS OF THE CA (LMTCA) CERTIFICATE HERE
</ca>
<cert>
PASTE CONTENTS OF THE CLIENT CERTIFICATE HERE
</cert>
<key>
PASTE CONTENTS OF THE ENCRYPTED PRIVATE KEY HERE
</key>
verb 4
mute 10
cipher AES-256-CBC
data-ciphers AES-256-CBC
auth SHA1
auth-user-pass
auth-nocache
redirect-gateway def1
4c. Pre-saving VPN credentials in the config (optional, but insecure — not recommended for shared devices)
The safest approach is to enter your VPN username and password in the OpenVPN Connect app when prompted. However, if you need to pre-embed them in the config, add an <auth-user-pass> block with the username and password on separate lines:
cipher AES-256-CBC
data-ciphers AES-256-CBC
auth SHA1
<auth-user-pass>
Username
Password
</auth-user-pass>
auth-nocache
redirect-gateway def1
...
First, get the .ovpn file onto your Android device. You have a few options:
- WinBox for Android: Open the WinBox app, navigate to Files, tap on the
.ovpnfile, tap the ⋯ (three-dot) menu in the top-right corner, then tap Download. - From your computer: Email the file to yourself, upload it to cloud storage (Google Drive, Dropbox, OneDrive), or transfer it via USB.

Once the file is on your device, locate it in the Files app or your Downloads folder, tap on it to open the share menu, then select OpenVPN Connect from the available apps to hand it off to OpenVPN Connect.
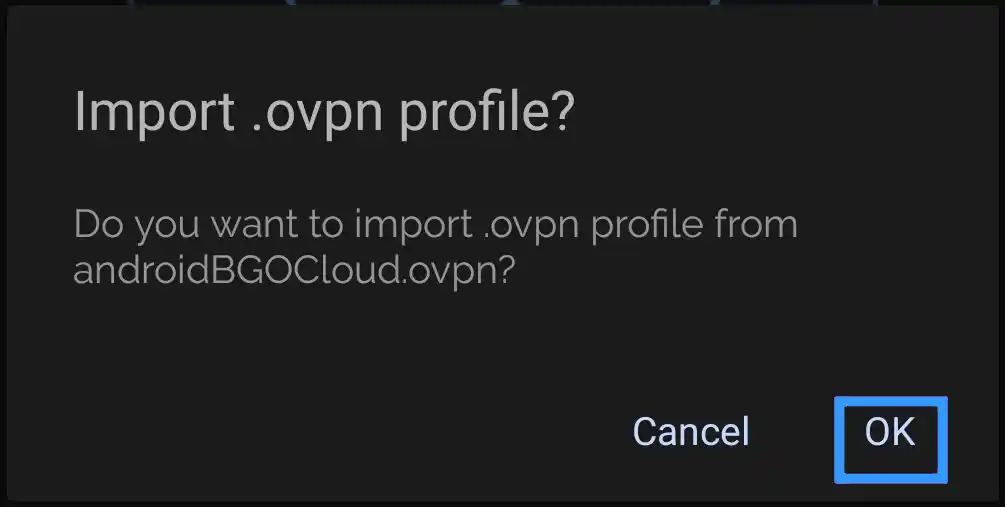
OpenVPN Connect will open and show the import dialog. Tap ADD to confirm the import.
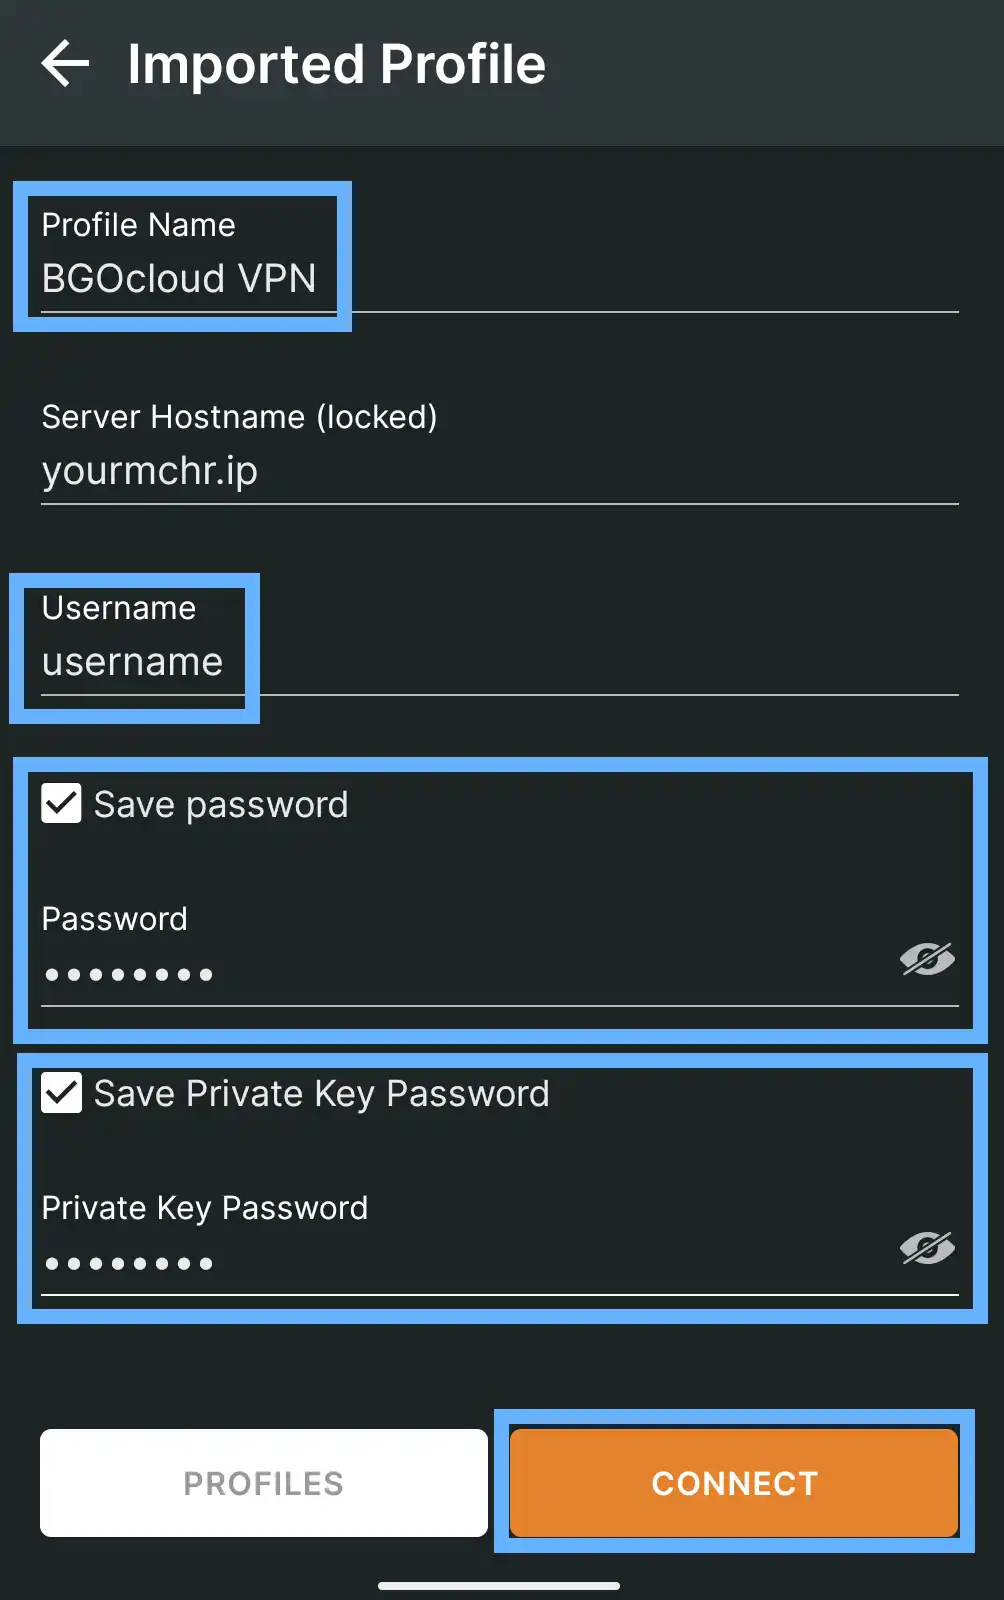
You'll land on the profile configuration screen. Give the profile a name you'll recognise, enter your VPN username, and check the Save password and Save Private Key Password boxes if you don't want to be prompted every time you connect. Enter the VPN password from Step 2 and the Private Key Password (the export passphrase you set in Step 3), then tap CONNECT.
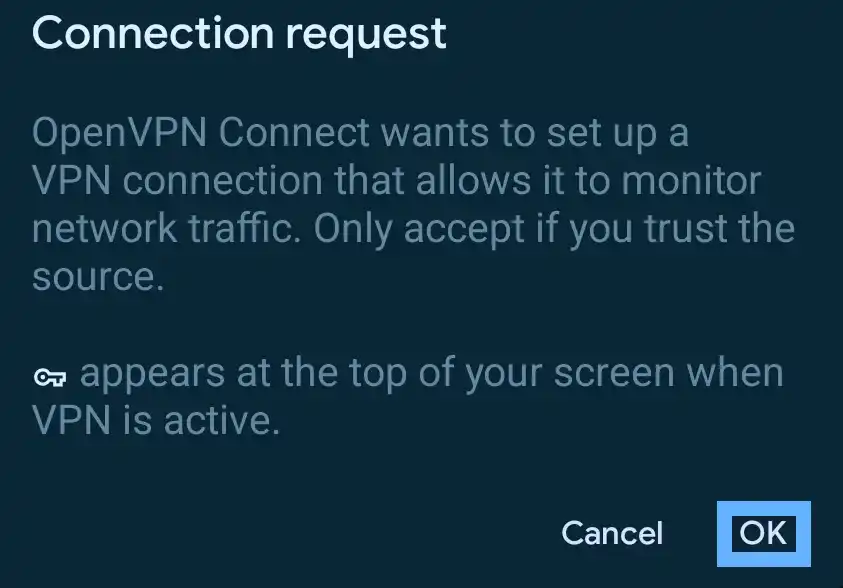
Android will ask for permission to create a VPN configuration on your device. Tap OK or Allow — this is a standard system prompt and is required for any VPN app on Android.
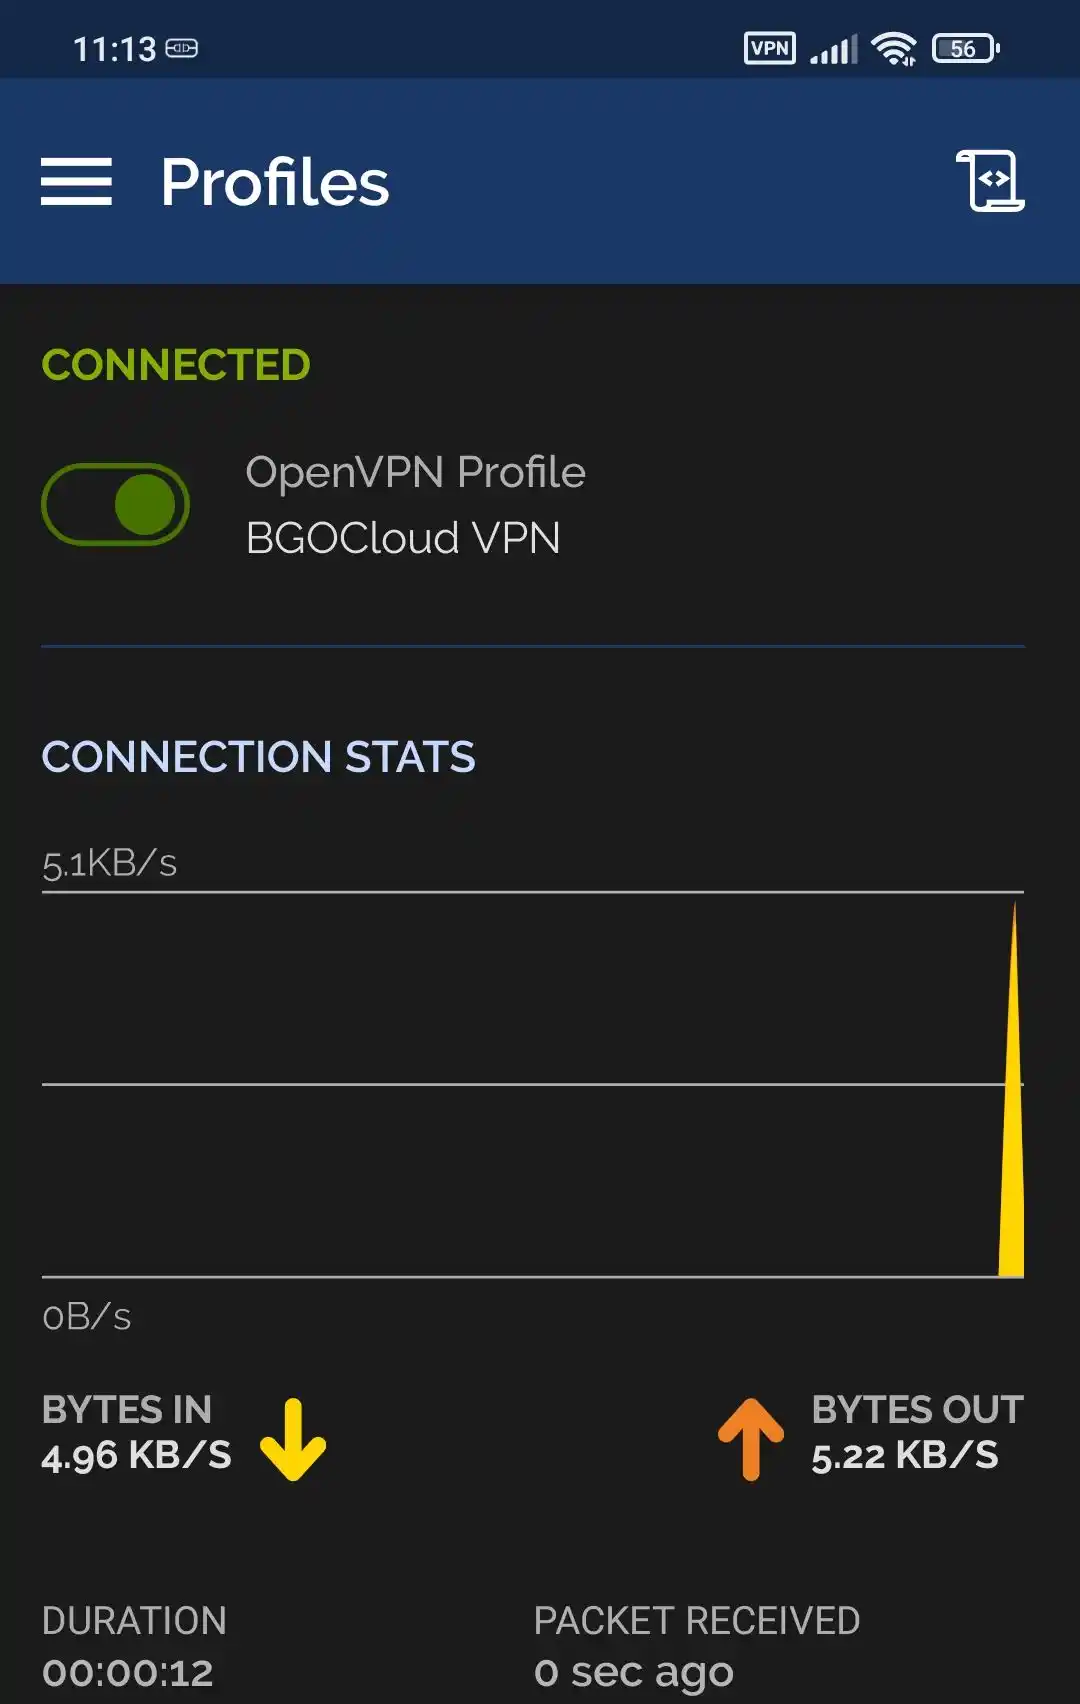
That's it. OpenVPN Connect will show CONNECTED with live traffic stats once the tunnel is up.
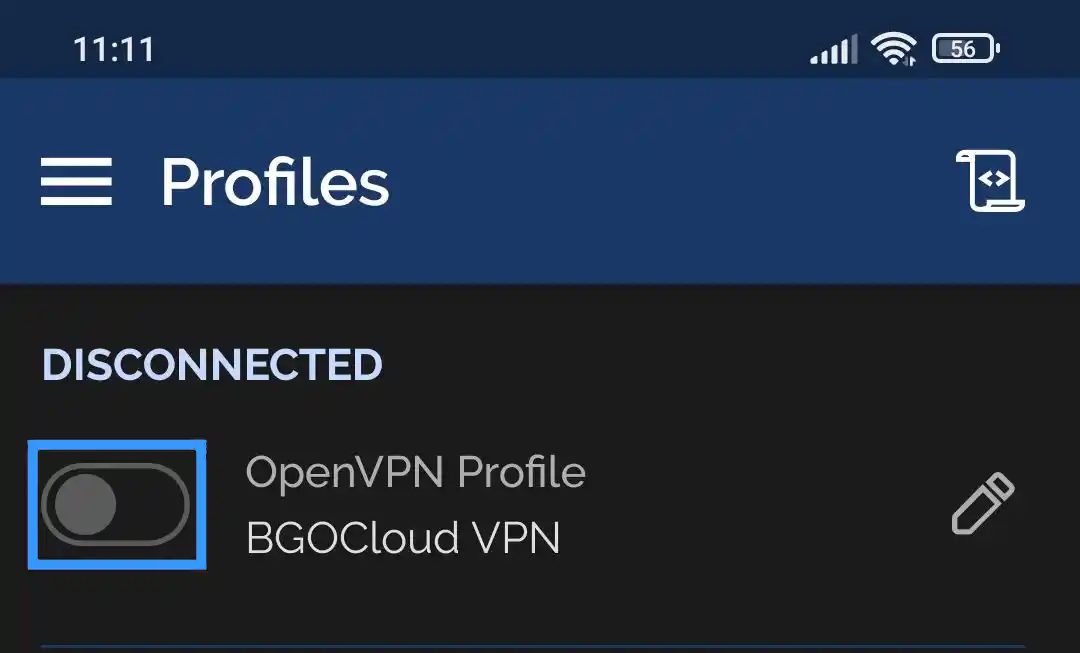
The next time you want to connect, simply open OpenVPN Connect and tap the toggle next to your profile — no need to re-import anything.
Your Android device is now connected to your MikroTik CHR OpenVPN network. If you run into problems, check our OpenVPN troubleshooting guide for common issues and fixes.
Connect your other devices too:
Need a MikroTik CHR to host your VPN on? BGOCloud's MikroTik VPS plans give you full RouterOS access, SSD performance, and unlimited traffic options — ready in under a minute. The perfect foundation for running a private OpenVPN server.