
How-To: Configuring WireGuard in MikroTik CHR - Faster and secure VPN protocol
If you are looking to set up a fast, modern VPN server on your MikroTik router or Cloud Hosted Router (CHR), WireGuard is currently the best choice available. Compared to older protocols like PPTP, L2TP, and even OpenVPN, WireGuard is leaner, faster, and genuinely easier to configure — especially on a BGOCloud MikroTik CHR instance running RouterOS v7.
This guide walks you through the complete WireGuard server setup on MikroTik — from updating RouterOS all the way to firewall rules and NAT masquerading — using WinBox, WebFig, or the RouterOS CLI. The same steps apply to physical MikroTik devices running RouterOS v7 on x86 or ARM hardware.
Why WireGuard instead of OpenVPN, PPTP, or L2TP?
WireGuard is a modern, actively developed VPN protocol that solves a lot of the practical headaches that come with running older VPN solutions. Here is how it stacks up:
- Faster connections and higher throughput — WireGuard operates in the kernel space and uses a much slimmer codebase than OpenVPN, translating into noticeably better real-world speeds.
- Simpler setup, especially on a CHR — No IP pools, no PPP profiles, no secrets, no certificates. You create an interface, assign an IP, add peers, and you are done.
- State-of-the-art encryption — WireGuard uses Curve25519 for key exchange and ChaCha20-Poly1305 for traffic encryption. These are modern, audited algorithms considered resistant to quantum computing attacks — something older protocols cannot claim.
- Key-based authentication, no passwords — There are no usernames or passwords to manage. Access is controlled entirely by cryptographic public/private key pairs, which eliminates a whole category of brute-force attacks.
- No SSL certificates required — Unlike OpenVPN and SSTP, WireGuard does not need a Certificate Authority, server certificates, or client certificates. This makes disaster recovery and rebuilds significantly faster.
- Cross-platform support — Official WireGuard clients are available for Windows, macOS, Linux, Android, and iOS, so connecting any device to your VPN server is straightforward.
- Harder to block and firewall-friendly — WireGuard uses UDP and can run on any port, unlike PPTP and L2TP which use well-known ports that are frequently blocked by ISPs and corporate firewalls. It is also fully NAT-friendly.
- Fewer disconnections — WireGuard handles network changes (switching from Wi-Fi to mobile data, for example) much more gracefully than L2TP, which tends to drop and require manual reconnection.
- Lower resource usage — WireGuard uses less CPU and RAM than OpenVPN, which matters a lot on smaller BGOCloud CHR plans where resources are shared.
All BGOCloud MikroTik CHR plans support WireGuard natively starting from RouterOS v7. If you are still on RouterOS v6, step one of this guide covers the upgrade.
What you will need
- A BGOCloud MikroTik CHR, or any physical MikroTik device running on x86 or ARM hardware. Other architectures are supported too, though you might get really slow speeds and 100% CPU usage. If you do not have one yet, you can check our CHR plans and get one deployed in under a minute.
- A private IP network subnet to assign to the WireGuard interface and its peers. We will use
192.168.34.0/24throughout this guide. - One or more client devices that you want to connect to the VPN server.
Table of Contents
WireGuard support in RouterOS was introduced in version 7. If your CHR or MikroTik device is already running RouterOS v7, you can skip this step. If you are still on v6, you need to upgrade before the WireGuard menu will appear.
In WinBox or WebFig, go to System > Packages and click Check for Updates.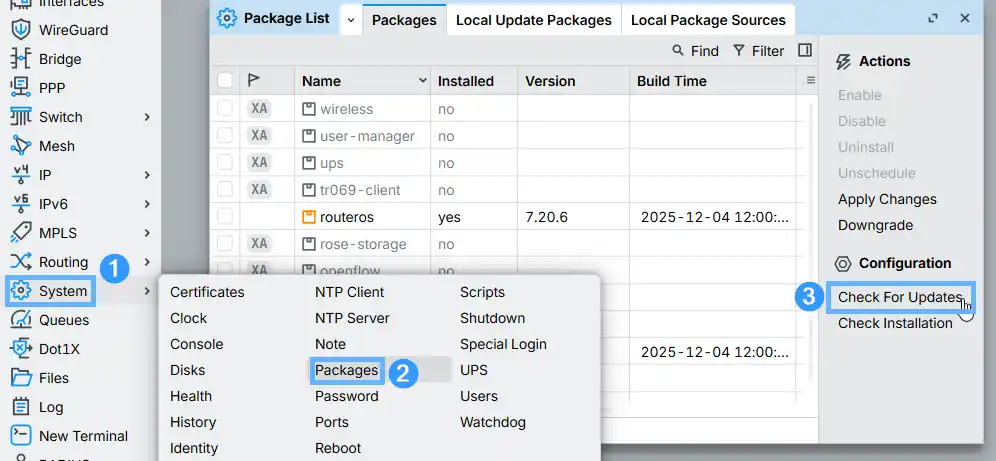
Alternatively, you can run the update from the CLI:
system package update download
system reboot
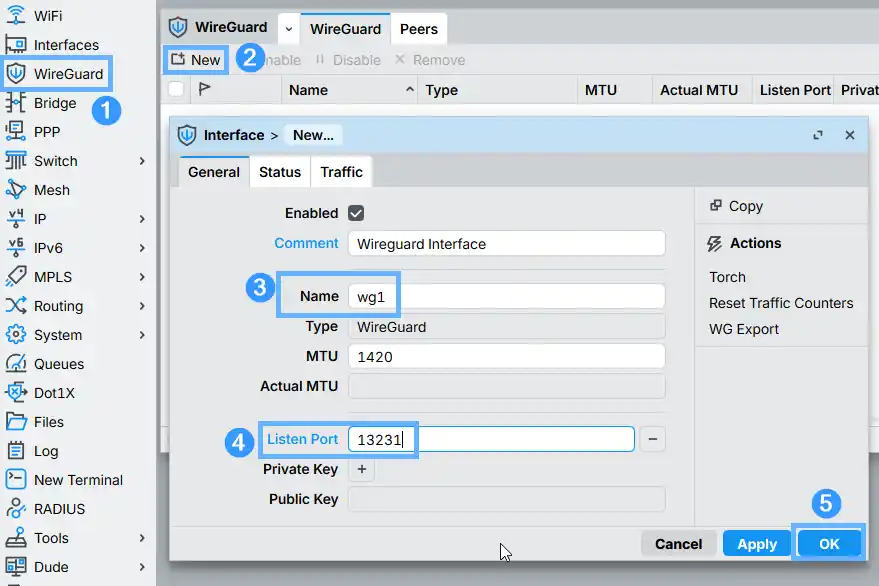
In WinBox or WebFig, open the WireGuard menu from the sidebar and click the + NEW button to add a new interface. Give it a descriptive name, or leave the default wg1. For the listen port, you can enter any unused, non-reserved port number. If you leave it blank, RouterOS will pick one automatically when you save. Click OK to create the interface.
If you plan to run multiple WireGuard interfaces on the same CHR, for example to separate different client groups, you can add a comment to each interface to keep things organised.
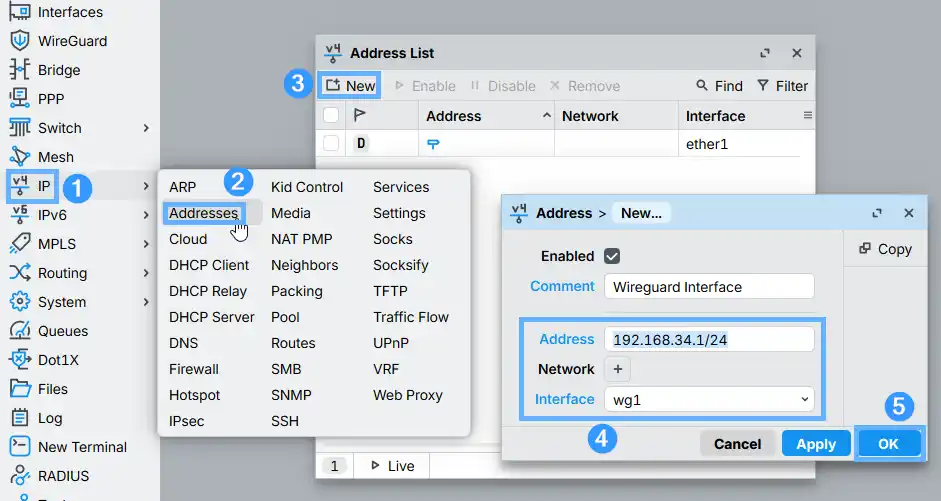
Next, assign an IP address to the WireGuard interface. Go to IP > Addresses, click + NEW, and enter the first usable address of your chosen private subnet. In this example we are using 192.168.34.1/24. Select your newly created WireGuard interface from the dropdown and save. The remaining addresses in that subnet (.2, .3, etc.) will be assigned manually to each peer (client) later.
If your CHR has a restrictive firewall, which we strongly recommend, as described in our MikroTik CHR basic security guide, you need to explicitly allow inbound traffic on the WireGuard UDP port, otherwise all connection attempts will be silently dropped.
Go to IP > Firewall > Filter Rules, click + NEW, and create a new rule with the following settings:
- Chain: input
- Protocol: UDP
- Dst. Port: the listen port you set in Step 2 (default:
13231) - Action: accept
- Comment: WireGuard pass
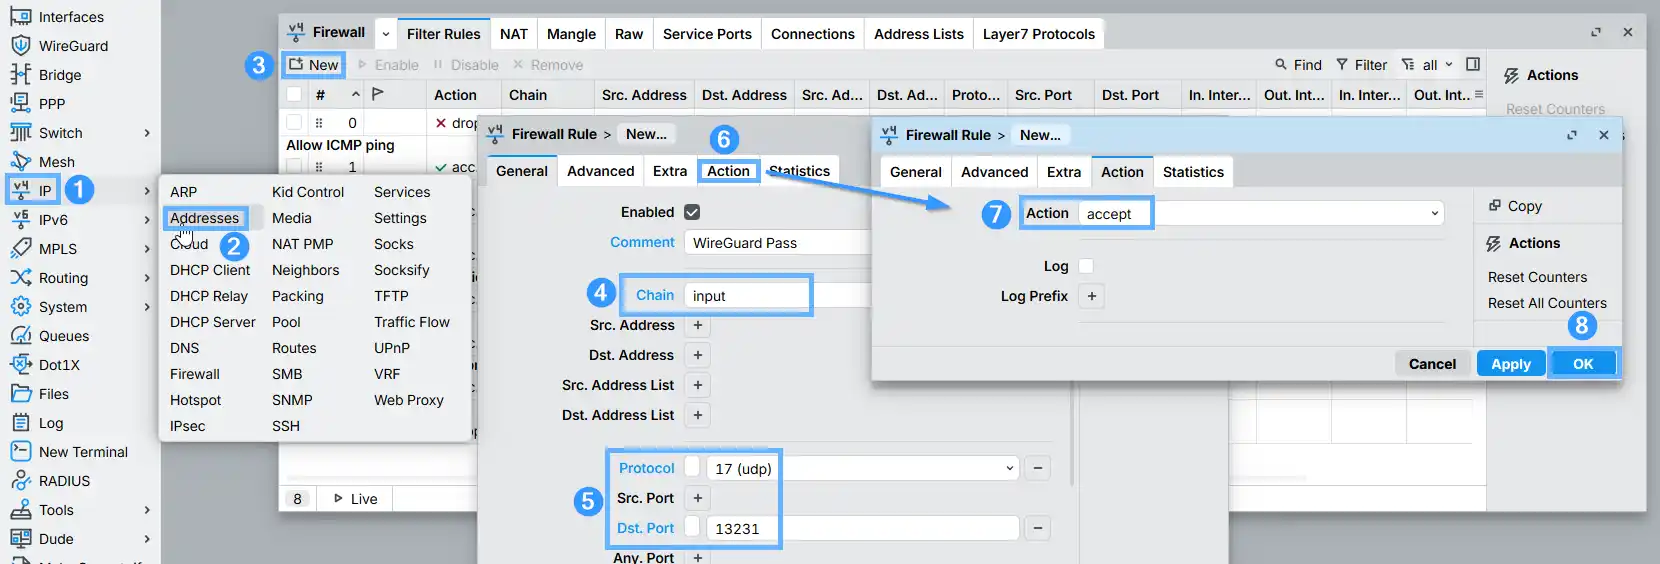
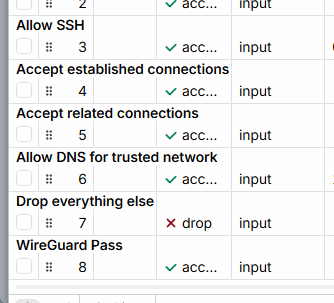
Save the rule, then drag it above any drop or reject rules in the list. If you put it too low, the drop rules will match incoming WireGuard packets before the accept rule gets a chance to process them.
From the CLI, use place-before to insert the rule above your existing drop rules. Adjust the port number to match your configuration:
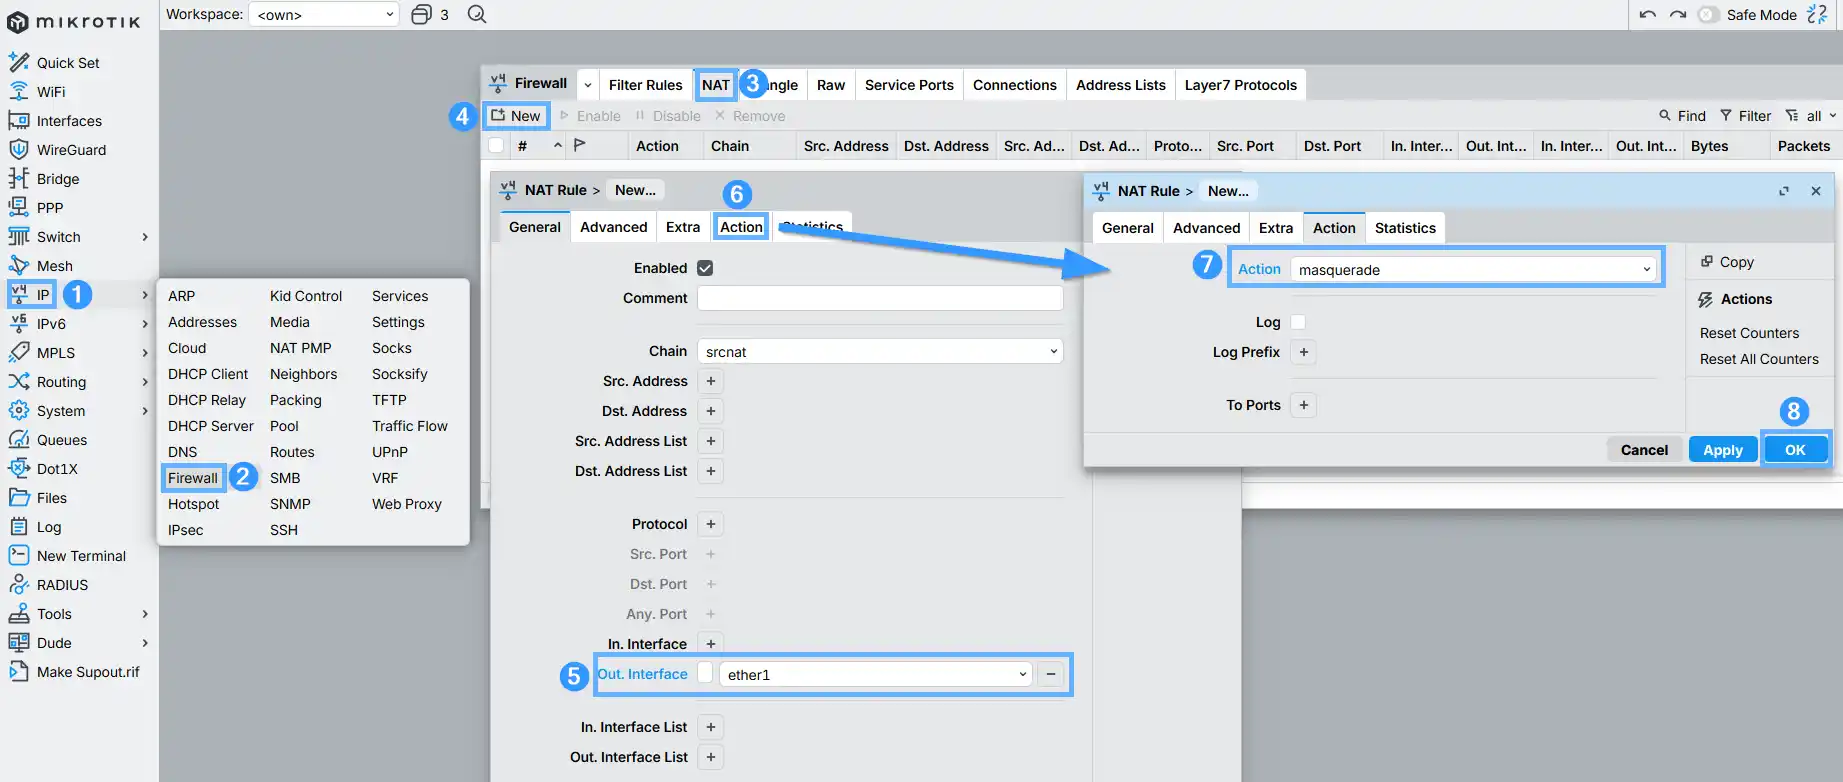
Now set up NAT masquerading so that VPN clients can reach the internet through the CHR. Go to IP > Firewall > NAT, click + NEW, and create a new rule:
- Chain: srcnat
- Out. Interface:
ether1(or whichever interface has your WAN / internet connection) - Action: masquerade
This step is only needed if you want WireGuard clients to access services running directly on the CHR — for example, if you are using the CHR as your DNS server, or if you are running an internal DNS resolver like Pi-Hole inside a Docker container, as covered in our Docker and Pi-Hole on MikroTik CHR guide.
By default, a restrictive firewall will block traffic originating from the WireGuard subnet from reaching other services on the router itself (DNS, HTTP, etc.). The rule below creates an explicit exception for the entire WireGuard network.
Go to IP > Firewall > Filter Rules, click +, and enter:
- Chain: input
- Src. Address: your WireGuard subnet — in our example,
192.168.34.0/24 - Action: accept
- Comment: Allow access from WireGuard network
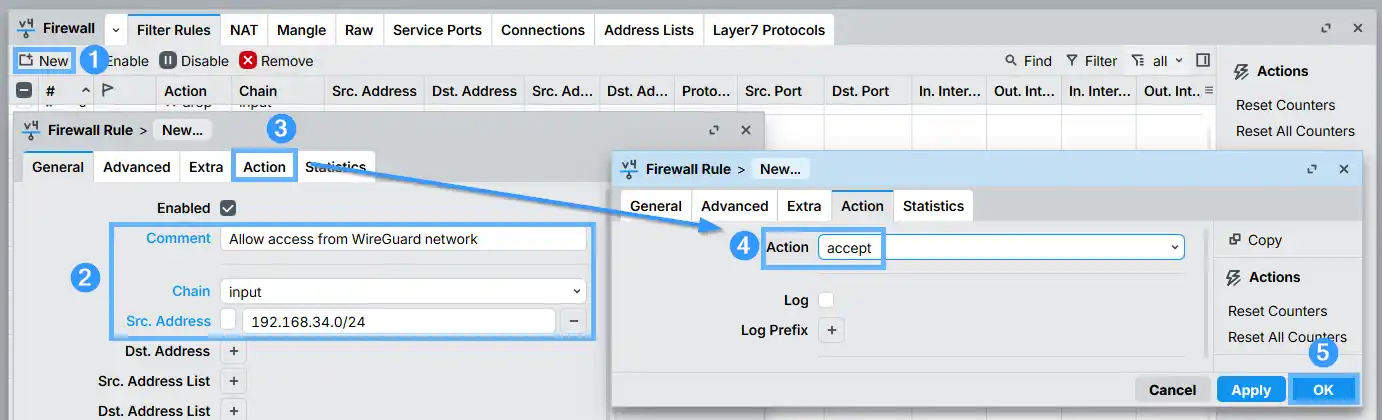
Save, then drag this rule above the drop rules just like you did with the WireGuard port rule.
Your WireGuard VPN server is now fully configured and running on your MikroTik CHR. The next step is adding peers — the individual client devices that will connect to it. WireGuard uses a peer-based model, so each device gets its own key pair and a manually assigned IP address from your WireGuard subnet.
Connect your devices to the WireGuard VPN server:
Need a MikroTik CHR to run this on? BGOCloud's MikroTik VPS plans give you a fully licensed RouterOS v7 instance with root access, SSD storage, and unlimited traffic options — deployed in under a minute. Everything in this guide works out of the box on our CHR instances, with no extra configuration needed on our end.
You can also browse our full MikroTik CHR knowledge base for more guides on getting the most out of your router.